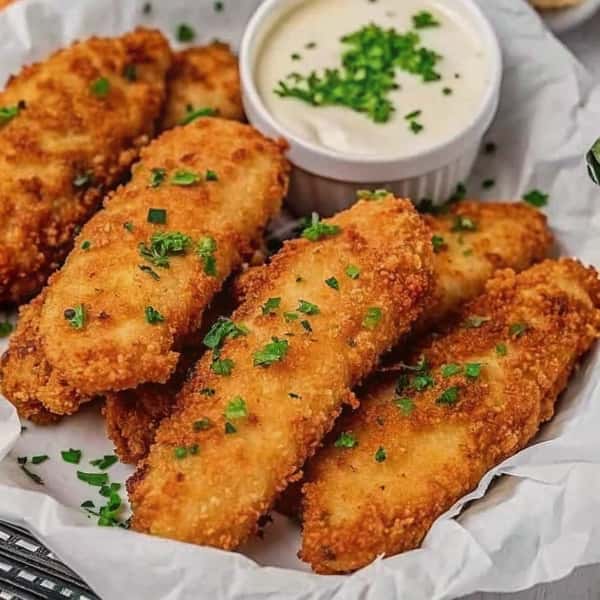
Ultimate Crispy Homemade Baked Chicken Tenders recipe
Crispy Homemade Baked Chicken Tenders are easy, delicious, and healthier than fried versions. These tender chicken strips get a golden, crunchy coating in the oven with no deep frying required. They’re perfect for weeknight dinners, meal prep, or feeding a crowd of any age.
You get perfectly crispy chicken tenders without the mess and extra calories of deep frying. The oven does all the work while you prepare sides or help kids with homework. These Crispy Homemade Baked Chicken Tenders come out golden brown on the outside and juicy on the inside, delivering that satisfying crunch everyone craves.
This recipe uses simple ingredients you likely have in your kitchen right now. No fancy equipment or complicated techniques are needed. Just chicken, a few pantry staples for the coating, and your oven. The result rivals any restaurant version but costs a fraction of the price.
Kids and adults both love these tenders. They’re mild enough for picky eaters yet flavorful enough to satisfy grown-up palates. Serve them as a main dish with your favorite sides, slice them over salads, or pack them in lunchboxes.
Table of Contents
Why Make This Recipe
Healthier than deep-fried options. Baking instead of frying dramatically reduces the amount of oil and calories. You still get that crispy coating and satisfying texture, but without the grease and heavy feeling that comes after eating fried food.
Kid-friendly and crowd-pleasing. Crispy Homemade Baked Chicken Tenders appeal to virtually everyone. Children who refuse most proteins often happily eat these. Adults appreciate the nostalgic comfort combined with better nutrition.
Perfect for meal prep. These tenders reheat beautifully, making them ideal for preparing ahead. Cook a double batch on Sunday and have protein ready for quick lunches and dinners throughout the week.
Budget-friendly meal option. Making Crispy Homemade Baked Chicken Tenders at home saves money while giving you control over ingredients and quality. Store-bought frozen tenders and restaurant versions cost significantly more.
How to Make Crispy Homemade Baked Chicken Tenders
Follow these straightforward steps and you’ll have restaurant-quality chicken tenders in about 30 to 35 minutes. The process involves preparing the chicken, setting up a breading station, coating each piece, and baking until golden and crispy.
Ingredients
- 1.5 lbs chicken tenders (or chicken breasts cut into strips)
- 1 cup all-purpose flour
- 2 teaspoons garlic powder
- 2 teaspoons paprika
- 1 teaspoon salt
- 1/2 teaspoon black pepper
- 1/2 teaspoon onion powder
- 2 large eggs
- 2 tablespoons milk
- 1.5 cups panko breadcrumbs
- 1/2 cup grated Parmesan cheese
- Cooking spray or olive oil
These ingredients create layers of flavor and texture. Fresh chicken tenders are ideal, but cutting chicken breasts into strips works perfectly. The flour mixture seasoned with garlic powder, paprika, salt, pepper, and onion powder creates the first coating layer.
Eggs mixed with milk form the wet layer that binds the crispy coating to the chicken. Panko breadcrumbs are essential for achieving maximum crispiness. Their larger, airier texture creates a lighter, crunchier coating than regular breadcrumbs. Parmesan cheese adds savory depth and helps with browning.
Directions
- Preheat your oven to 400°F (200°C). Line a baking sheet with parchment paper or aluminum foil and place a wire rack on top. Spray the rack with cooking spray to prevent sticking.
- Set up your breading station with three shallow bowls. In the first bowl, mix flour, garlic powder, paprika, salt, black pepper, and onion powder. In the second bowl, whisk together eggs and milk. In the third bowl, combine panko breadcrumbs and grated Parmesan cheese.
- Coat each chicken tender. Pat the chicken dry with paper towels. Dredge each piece in the flour mixture, coating all sides and shaking off excess. Dip into the egg mixture, letting excess drip off. Finally, press into the panko mixture, coating thoroughly and pressing gently so the crumbs adhere.
- Arrange coated tenders on the prepared rack. Space them slightly apart so air can circulate. Lightly spray the tops with cooking spray or drizzle with olive oil to promote browning and crispiness.
- Bake for 20 to 25 minutes, flipping halfway through. The tenders are done when the coating is golden brown and crispy, and the internal temperature reaches 165°F (74°C). Let rest for 3 to 5 minutes before serving.
The technique matters as much as the ingredients. Patting the chicken dry ensures the coating sticks properly. Using a wire rack allows hot air to circulate around the entire tender, creating even crispiness on all sides.
How to Serve Crispy Homemade Baked Chicken Tenders
Serve hot with your favorite dipping sauces like honey mustard, barbecue sauce, ranch dressing, or buffalo sauce. Pair with classic sides like french fries, sweet potato fries, coleslaw, or a simple green salad. These Crispy Homemade Baked Chicken Tenders also work beautifully sliced over Caesar salad or tucked into wraps.
Presentation makes even simple food more appealing. Arrange the tenders on a platter with small bowls of different sauces for dipping. Garnish with fresh parsley or lemon wedges for color.
For a complete family meal, serve alongside mac and cheese, mashed potatoes, or roasted vegetables. Steamed broccoli, green beans, or corn on the cob provide nutritious balance.
How to Store Crispy Homemade Baked Chicken Tenders
Cool completely to room temperature before storing. Keep in an airtight container in the fridge for 3 to 4 days. For best texture when reheating, use the oven or air fryer rather than the microwave. Reheat at 375°F for 8 to 10 minutes until heated through and crispy again.
For longer storage, freeze cooked Crispy Homemade Baked Chicken Tenders for up to 3 months. Arrange cooled tenders in a single layer on a baking sheet and freeze until solid, then transfer to freezer bags.
When reheating refrigerated tenders, the oven or air fryer restores the crispy coating much better than the microwave. Arrange in a single layer and heat until warmed through.
Tips to Make Crispy Homemade Baked Chicken Tenders
- Pat chicken completely dry before breading for better coating adhesion.
- Use a wire rack on your baking sheet so air circulates around the tenders for even crispiness.
- Don’t skip the cooking spray or oil on top, as this helps achieve golden color and crunch.
- Let tenders rest a few minutes after baking so juices redistribute and the coating sets.
- For extra crispy results, use panko breadcrumbs rather than regular breadcrumbs.
These tips transform good tenders into exceptional ones. Moisture is the enemy of crispy coatings, so thoroughly drying the chicken before breading is crucial.
The wire rack is one of the most important elements. Without it, the bottom of the tenders sits in their own moisture and never gets crispy. The rack allows hot air to flow underneath, creating crispy coating on all sides.
Variation
- Use different seasonings in the flour mixture like cayenne pepper, Italian herbs, or ranch seasoning mix.
- Try crushed cornflakes or crushed crackers instead of panko for different texture.
- Make spicy tenders by adding hot sauce to the egg mixture and cayenne to the breading.
- Use buttermilk instead of regular milk in the egg wash for extra tender, flavorful chicken.
These variations keep the recipe interesting and adaptable. Different spice blends completely change the flavor profile. Italian seasoning creates a Mediterranean vibe. Ranch seasoning mix makes them taste like popular ranch-flavored snacks.
Alternative coatings create unique textures. Crushed cornflakes provide old-fashioned crispiness. Crushed Ritz crackers add buttery richness.
Pairing
- Classic sides like french fries, tater tots, or sweet potato fries.
- Fresh vegetables such as carrot sticks, celery, cherry tomatoes, or cucumber slices.
- Creamy coleslaw or potato salad for a picnic-style meal.
- Mac and cheese, mashed potatoes, or corn on the cob for hearty comfort food.
These pairings create complete, satisfying meals. French fries are the classic choice, beloved by kids and adults alike. Sweet potato fries offer a healthier alternative with natural sweetness that complements the savory tenders.
Fresh vegetables add crunch, color, and nutrition. Raw veggies with ranch dip make an easy, healthy side that requires no cooking.
Food Safety
- Cook chicken to an internal temperature of 165°F (74°C) measured with a meat thermometer.
- Keep raw chicken separate from ready-to-eat foods to prevent cross-contamination.
- Wash hands, utensils, and surfaces thoroughly after handling raw chicken.
- Refrigerate leftovers within two hours of cooking.
Food safety is essential when working with chicken. Use a meat thermometer to verify the internal temperature reaches 165°F in the thickest part of the tender.
Raw chicken can harbor harmful bacteria like Salmonella. Never let raw chicken or its juices contact foods that won’t be cooked. Use separate cutting boards for raw meat and produce when possible.
FAQs
Can I use chicken breasts instead of tenders?
Yes. Cut chicken breasts into even strips about 1 inch thick. They may need a few extra minutes of baking time since they’re often thicker than pre-cut tenders.
How do I keep the coating from falling off?
Pat the chicken very dry before breading. Make sure each piece is thoroughly coated in flour first, as this helps the egg stick. Press the breadcrumbs firmly onto the chicken.
Can I make these gluten-free?
Yes. Use gluten-free flour and gluten-free breadcrumbs or crushed gluten-free crackers. Everything else in the recipe is naturally gluten-free.
Can I prepare these ahead and bake later?
Yes. Bread the tenders and arrange on the rack, then cover and refrigerate for up to 4 hours before baking. This actually helps the coating adhere better.
Why aren’t my tenders crispy?
Make sure you’re using a wire rack so air circulates underneath. Don’t skip the cooking spray on top. Ensure your oven is properly preheated to 400°F.
Can I air fry these instead?
Yes. Air fry at 400°F for 10 to 12 minutes, flipping halfway through. Work in batches to avoid overcrowding, which prevents crispiness.
Conclusion
Crispy Homemade Baked Chicken Tenders deliver everything you love about fried chicken with less guilt and mess. With simple ingredients, straightforward steps, and foolproof technique, this recipe produces golden, crunchy, juicy results that rival any restaurant version.
The combination of seasoned coating, proper breading technique, and high-heat baking creates that satisfying crunch we all crave. The chicken stays moist and tender inside while developing a golden, crispy exterior.
Whether you’re feeding picky children, meal prepping for the week, or hosting a casual gathering, these Crispy Homemade Baked Chicken Tenders deliver. They’re healthier than fried, easier to make than you might think, and absolutely delicious. Try making them tonight and discover why this recipe becomes a family favorite.