
Welcome – if you love comfort food with a twist, this post is for you. In under 20 minutes you’ll learn how to make a restaurant-quality Grilled Cheese Burrito that’s melty, crunchy, and endlessly customizable. This guide is written for busy home cooks, beginners, and anyone looking for an easy, time-saving supper that’s affordable and satisfying. Expect clear steps, pro tips, and voice-search friendly answers so you can say, “How do I make a Grilled Cheese Burrito?” and get a fast result.
If you like small-batch snacks to pair with this meal, check out these cranberry cream cheese crescent bites for a sweet-savory combo.
Table of Contents
Why This Recipe Works
This Grilled Cheese Burrito blends two all-time favorites: the gooey melt of grilled cheese and the hand-held convenience of a burrito. It’s beginner-friendly, affordable, and fast – ideal for weeknights, late-night cravings, or a satisfying lunch. The technique ensures the tortilla crisps up without leaking cheese, and simple flavor swaps keep the recipe versatile for picky eaters or adventurous cooks.
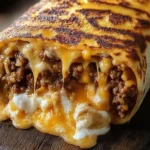
Grilled Cheese Burrito
Ingredients
Method
- Grate cheeses and prepare all fillings. Warm tortillas for 10–15 seconds in the microwave to make them pliable.
- Lay a tortilla flat and add a layer of shredded cheddar near the center, followed by mozzarella. Top with protein and salsa, keeping the fillings away from the edges.
- Fold the sides in, then roll from the bottom up like a burrito. Press gently to compact.
- For stovetop, heat 1 tbsp butter or oil in a skillet over medium heat. Place seam-side down and cook for 2–3 minutes until golden, then flip and cook the other side for 1–2 minutes until crisp and cheese melts.
- For panini press, brush outside with butter or oil and press for 3–4 minutes until browned and cheese is melted.
- Let the burrito rest for 1 minute, then slice in half on a bias to reveal the gooey interior.
Notes
What You’ll Need to Make a Grilled Cheese Burrito
Here’s what you’ll need to make this Grilled Cheese Burrito. Quantities assume two burritos; scale up as needed.
Large flour tortillas (8-10 inches) – soft, flexible tortillas wrap and crisp well.
Shredded cheddar cheese (1½ cups) – melts beautifully; use sharp for more flavor.
Shredded mozzarella (½ cup) – for extra stretch and creaminess.
Cooked chicken or black beans (1 cup, optional) – adds protein; use pre-cooked or canned.
Sliced avocado (½) – adds creaminess and healthy fat.
Salsa or pico de gallo (¼ cup) – bright acidity balances the cheese.
Butter or olive oil (2 tbsp) – for skillet crisping.
Optional: cooked bacon, jalapeños, or sautéed onions – for extra flavor.
For a snack pairing, try these cranberry cream cheese crescent bites as an easy side.
Equipment
You don’t need fancy tools to make a great Grilled Cheese Burrito. Essentials:
Nonstick skillet or cast-iron pan – delivers even browning.
Spatula – for flipping gently.
Grater – if shredding your own cheese (fresher melt).
Optional: panini press or sandwich maker – presses and crisps quickly (affiliate-friendly: consider a compact panini press for small kitchens).
Step-by-Step Process
Prep and assemble ingredients
Grate cheeses and have fillings ready to go. Warm tortillas for 10-15 seconds in the microwave to make them pliable.
Build the burrito
Lay a tortilla flat. Add a layer of shredded cheddar near the center, then a thin layer of mozzarella. Place your protein (beans or chicken) and salsa on top, keeping fillings away from the edges to prevent leaks.
Fold tightly
Fold the sides in, then roll from the bottom up like a typical burrito. Press gently to compact.
Pan-toasted sear (Stovetop method)
Heat 1 tbsp butter or oil in a skillet over medium heat. Place seam-side down first to seal. Cook 2-3 minutes until golden and firm, then flip and cook the other side 1-2 minutes until crisp and cheese is melted.
Panini press method (Quick option)
Brush outside with a thin coat of butter or oil and press for 3-4 minutes until evenly browned and cheese is fully melted.
Rest and slice
Let the burrito rest 1 minute, then slice in half on a bias to reveal the gooey interior.
Subheads for complex steps
Melting without leaking: Keep cheese and wet fillings centered. A thin inside layer of cheese under wetter fillings creates a seal.
Achieving perfect crisp: Medium heat prevents burning while allowing cheese to melt; a cast-iron pan helps with consistent browning.
Pro Tips & Troubleshooting
Use a cheese blend: Equal parts sharp cheddar and mozzarella give flavor and stretch.
Avoid soggy tortillas: Drain wet fillings and pat with a paper towel before assembly.
If the tortilla splits: Warm it slightly longer before wrapping or use a larger tortilla.
Fix trapped steam: Pierce a small vent on the top after searing to prevent steam from making the shell soggy.
Want extra crunch? After searing, transfer to a 400°F oven for 3-4 minutes.
Common FAQs included here:
Q: Why isn’t my cheese melting? A: Use freshly shredded cheese (pre-shredded contains anti-caking agents that slow melting).
Q: How to avoid leakage? A: Keep fillings centralized and don’t overfill. Use a tight wrap and start seam-side down in the skillet.
Best Ways to Use and Easy Variations
Classic side pairings: Serve with chips and salsa, a crisp green salad, or pickled jalapeños.
Easy variations: Make a breakfast Grilled Cheese Burrito with scrambled eggs and sausage; or swap chicken for seasoned pulled pork for a hearty dinner.
Best ways to use leftovers: Chop cooled burritos and toss into a skillet with eggs for a breakfast hash, or slice and air-fry for crunchy appetizers.
Simple adjustments: Reduce cheese by half and add roasted vegetables for a lighter take.
How Long It Keeps and Reheating Tips
Refrigerator: Store wrapped burritos in an airtight container for up to 3 days. Reheat in a skillet or air fryer for best texture.
Freezer: Wrap tightly in foil and freeze up to 2 months. Reheat from frozen in a 375°F oven for 20-25 minutes, or in an air fryer at 360°F for 12-15 minutes.
Quick voice-search answer: “How long does a Grilled Cheese Burrito last?” – Refrigerated 3 days, frozen 2 months; reheat in skillet, oven, or air fryer.
Health Benefits, Value Facts, and Key Takeaways
A typical Grilled Cheese Burrito (with cheese and beans, moderate fillings) contains approximately:
Calories: 600-750 kcal
Protein: 25-35 g (higher with chicken or bacon)
Fat: 30-45 g (depends on cheese and butter)
Carbs: 50-60 g
Health benefits: adds calcium and protein from cheese and beans; use whole-wheat tortillas and reduced-fat cheese for a lighter option. Key takeaways: this is an indulgent, filling meal that can be balanced with veggies and portion control.
Food Safety
Hygiene: Wash hands, utensils, and surfaces after handling raw meat.
Safe cooking temperatures: If you add chicken, ensure it reaches 165°F (74°C) internal temperature. Pork should reach 145°F with a rest time; ground meats should be 160°F.
Prevent cross-contamination: Use separate cutting boards for raw protein and produce. Clean and sanitize pans between uses if switching from raw meats to cheese-only cooking.
Storage safety: Cool leftovers quickly (within 2 hours) and refrigerate to prevent bacterial growth.
Quick Voice-Search Ready Answers
What is a Grilled Cheese Burrito?
A Grilled Cheese Burrito is a fusion of a grilled cheese sandwich and a burrito – melted cheese and fillings wrapped in a tortilla, seared until the outside is crispy and the inside is gooey.
Can I make a Grilled Cheese Burrito without meat?
Yes. Use beans, sautéed mushrooms, or roasted vegetables for a vegetarian option that still offers protein and hearty texture.
How do I stop my tortilla from getting soggy?
Keep wet ingredients centered, pat fillings dry, use a tight wrap, and sear on medium heat to evaporate excess moisture quickly.
Is a Grilled Cheese Burrito healthy?
It can be balanced. Choose whole-wheat tortillas, lean proteins, and add vegetables. Control portion size and reduce butter to make it a healthier meal.
How long does a Grilled Cheese Burrito last in the fridge?
Store for up to 3 days in an airtight container; freeze for up to 2 months. Reheat in a skillet or air fryer for best texture.
Conclusion
This Grilled Cheese Burrito is a simple, fast, and customizable comfort-food winner – perfect for busy nights, satisfying lunches, or creative meal prep. You learned what you’ll need, step-by-step assembly, troubleshooting fixes, storage tips, nutrition facts, and safety steps to make each burrito reliably delicious. Try the stovetop or panini press method and experiment with fillings to find your favorite version. For a quick reference to a popular fast-food take on this idea, check out this Grilled Cheese Burrito for inspiration and comparisons.
If you enjoyed this recipe, try other mashups and easy hand-held ideas in our kitchen collection or leave a comment telling us your favorite filling swap.
